
Before you start
Website forms live under Integrations Settings in your company settings. Your company needs the Website Embed add-on. The multi-step quote widget also needs the Full-Quote Embed add-on, and chat leads need the Tawk.to Integration add-on. An admin turns them on in Add-on Management.
Company admins and marketing managers can build and edit forms. Only a company admin can connect Tawk.to.
Open Website Embed
- Open your company settings and choose Integrations Settings.
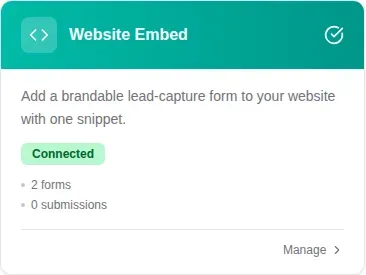
- Find the Website Embed card and click Manage.
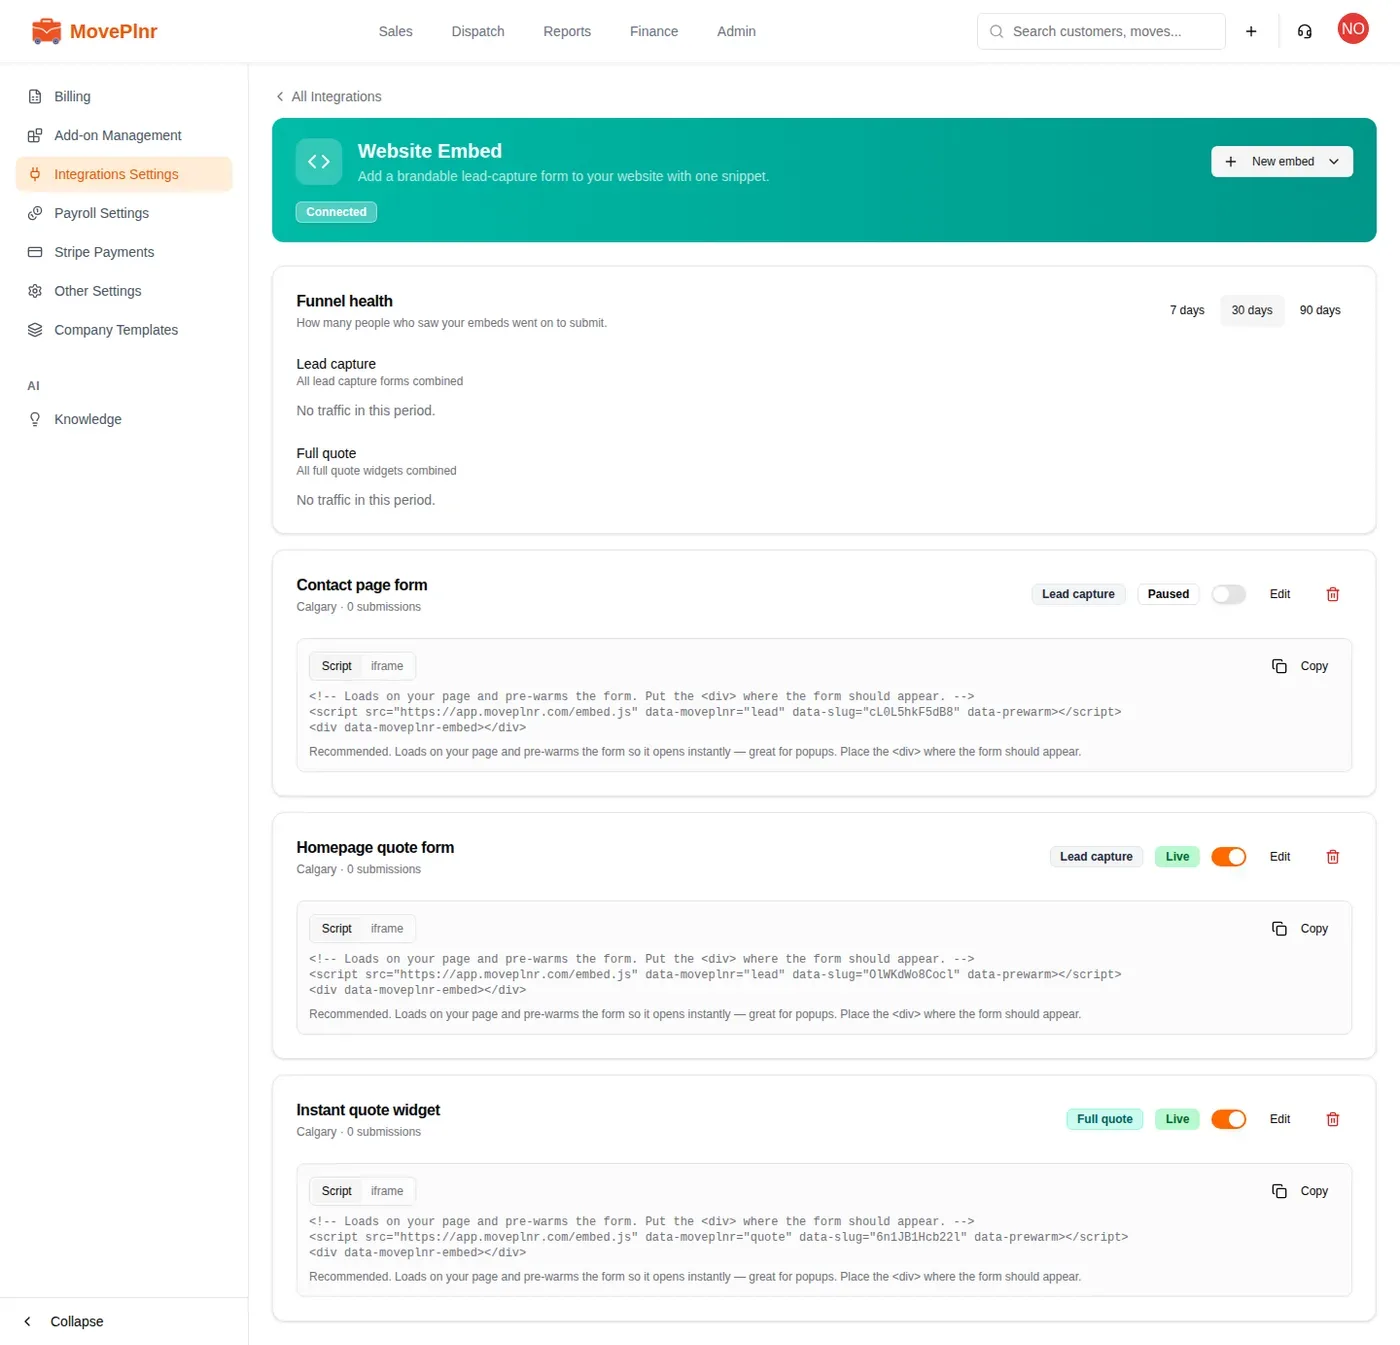
The page lists every form you have built, with its snippet underneath. At the top, Funnel health shows how many people saw your forms and how many sent one in.
Create a lead capture form
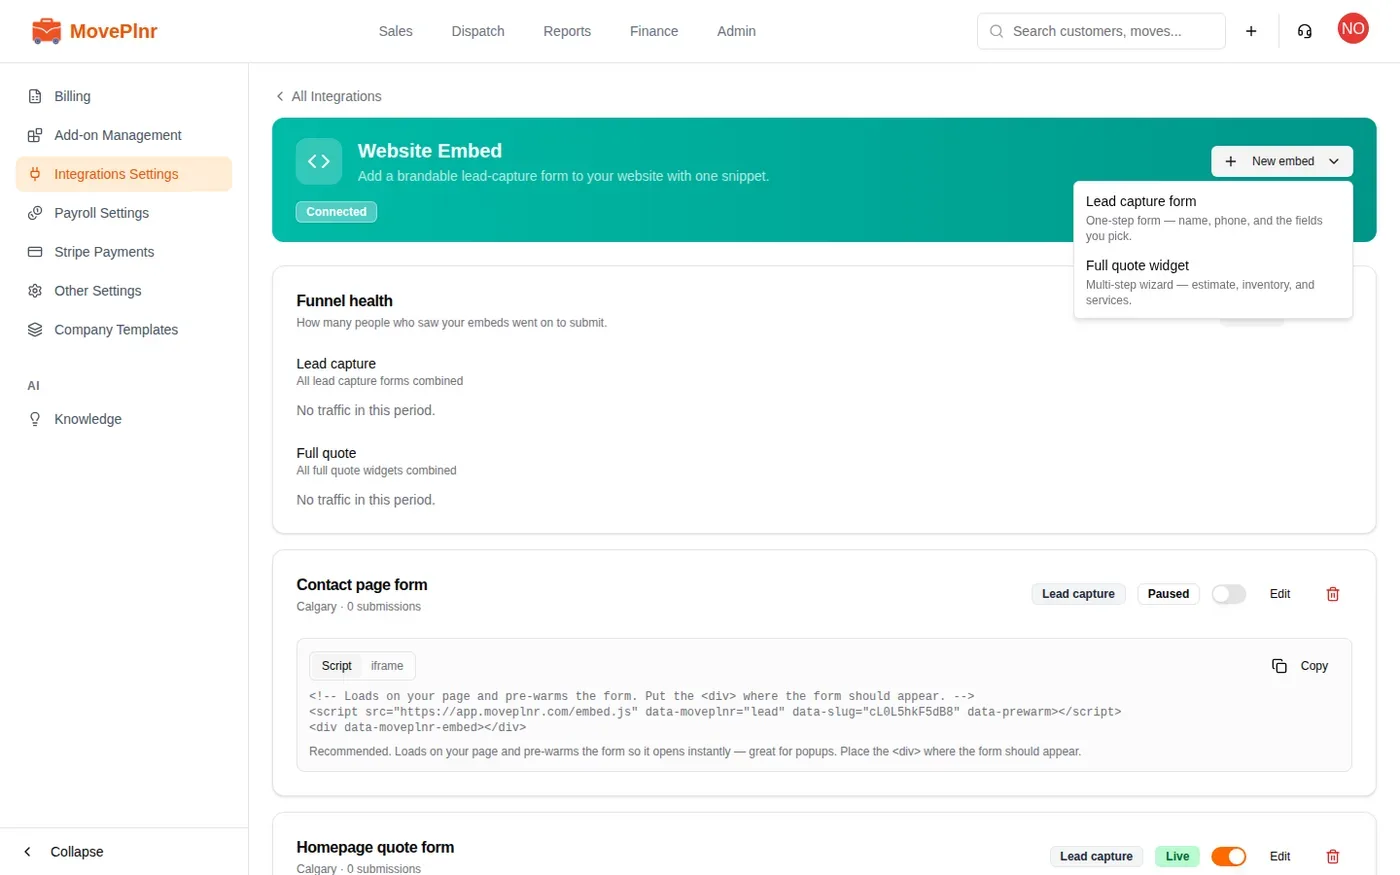
- Click New embed, then Lead capture form.
- Give the form a Name your team will recognise, like “Homepage quote form”.
- Pick the Location its leads go to.
Pick the fields
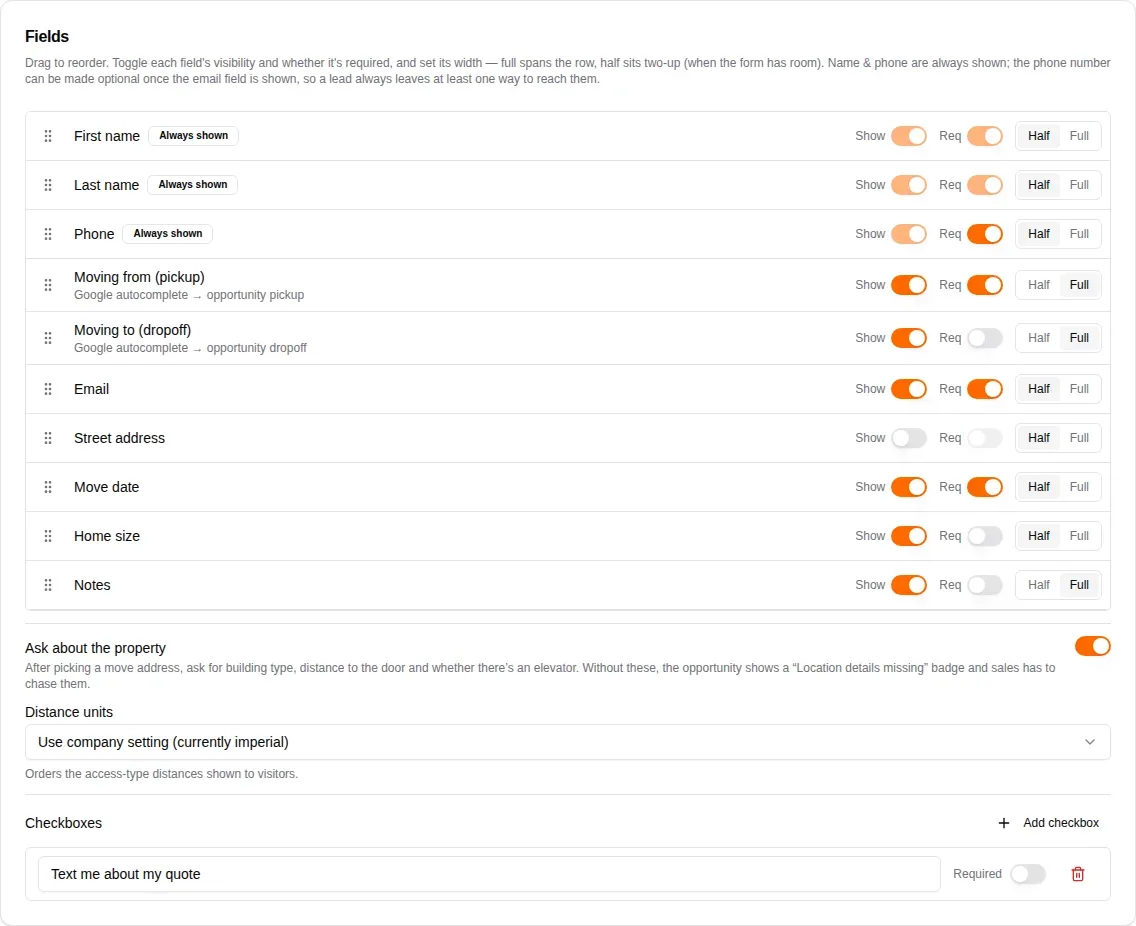
The Fields card decides what the form asks. First name, last name and phone are always on the form. Everything else is yours to choose.
- Show puts a field on the form. Req makes it required.
- Half sits a field beside another one when the form has room. Full gives it the whole row.
- Drag a row by its handle to change the order.
- Phone can be made optional once the email field is shown, so every lead leaves at least one way to reach them.
- Moving from (pickup) and Moving to (dropoff) use address search, and the address lands on the lead.
- Ask about the property adds questions about the building type, the distance to the door and an elevator, after each move address. Without them, sales has to call and ask.
- Add checkbox adds a tick box, like “Text me about my quote”. Ticked boxes are written into the lead’s notes.
Write the wording
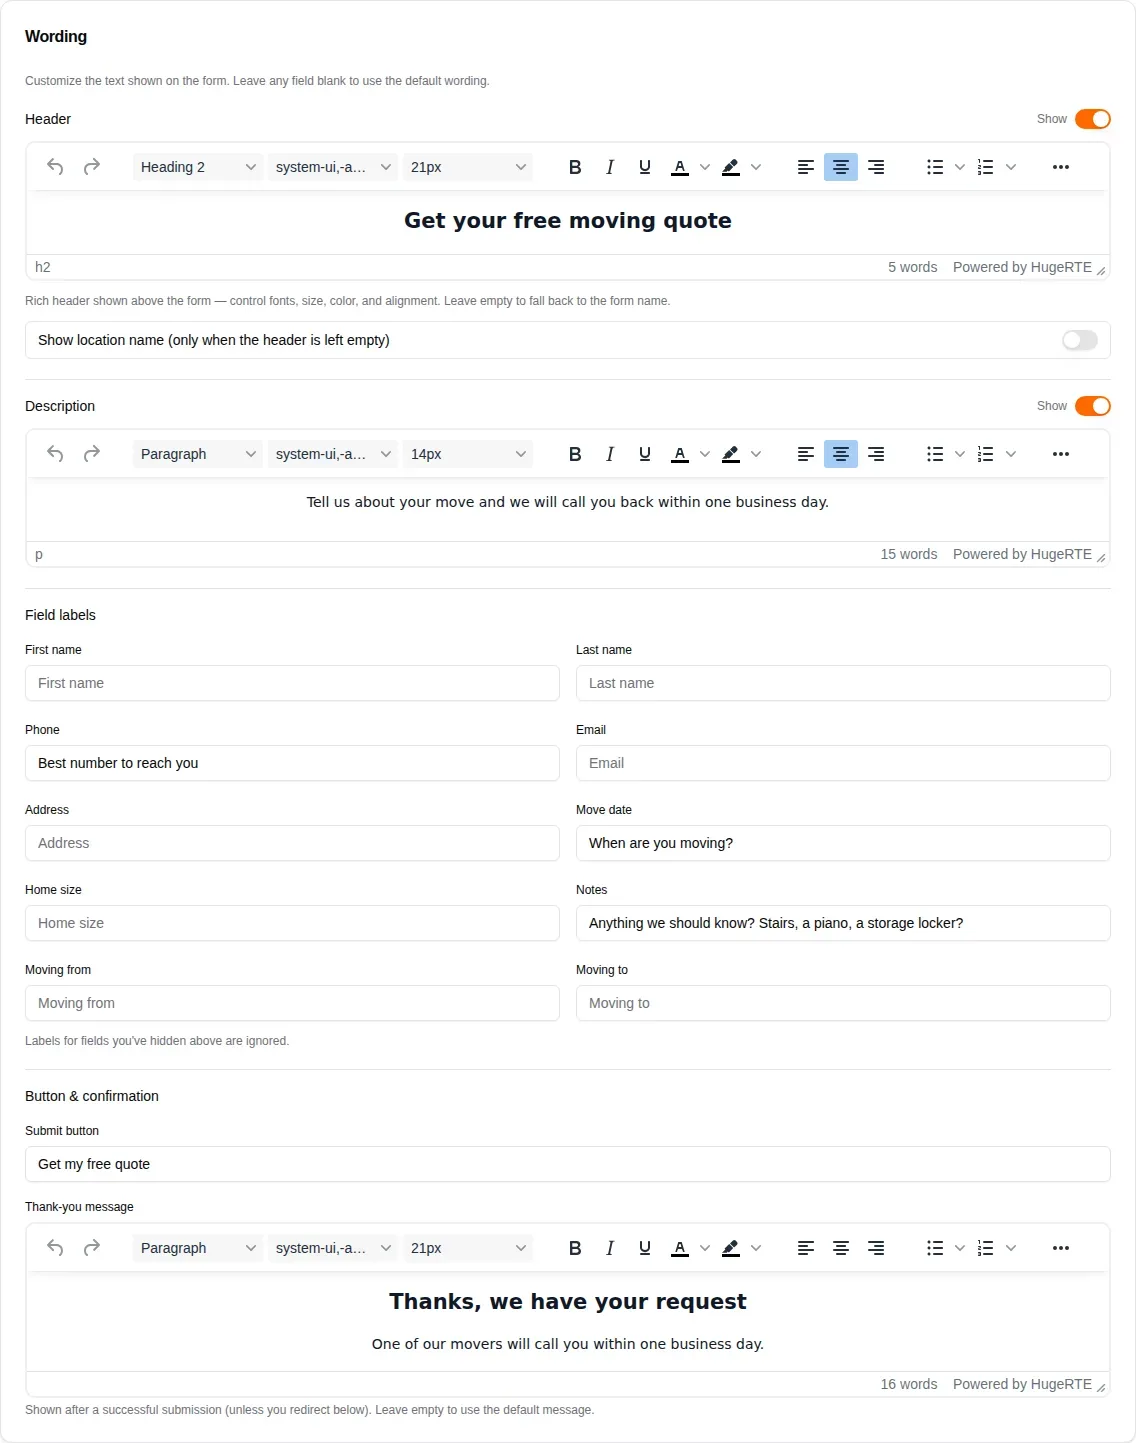
The Wording card is where the form starts to sound like you. Leave any box blank and the form uses its standard wording.
- Header is the title above the form. Style it with the toolbar: size, colour, alignment. Turn it off if your page already has a heading.
- Description is an optional line under the header.
- Field labels rename any field. “Phone” can read “Best number to reach you”.
- Submit button is the text on the button.
- Thank-you message is what people see after they send the form.
Set the layout and colours
- Under Layout, choose Auto, 1 column or 2 columns. Auto shows one column on narrow pages and two when there is room.
- Set Max width (px), anywhere from 280 to 1200. Two columns need a wider form to sit side by side.
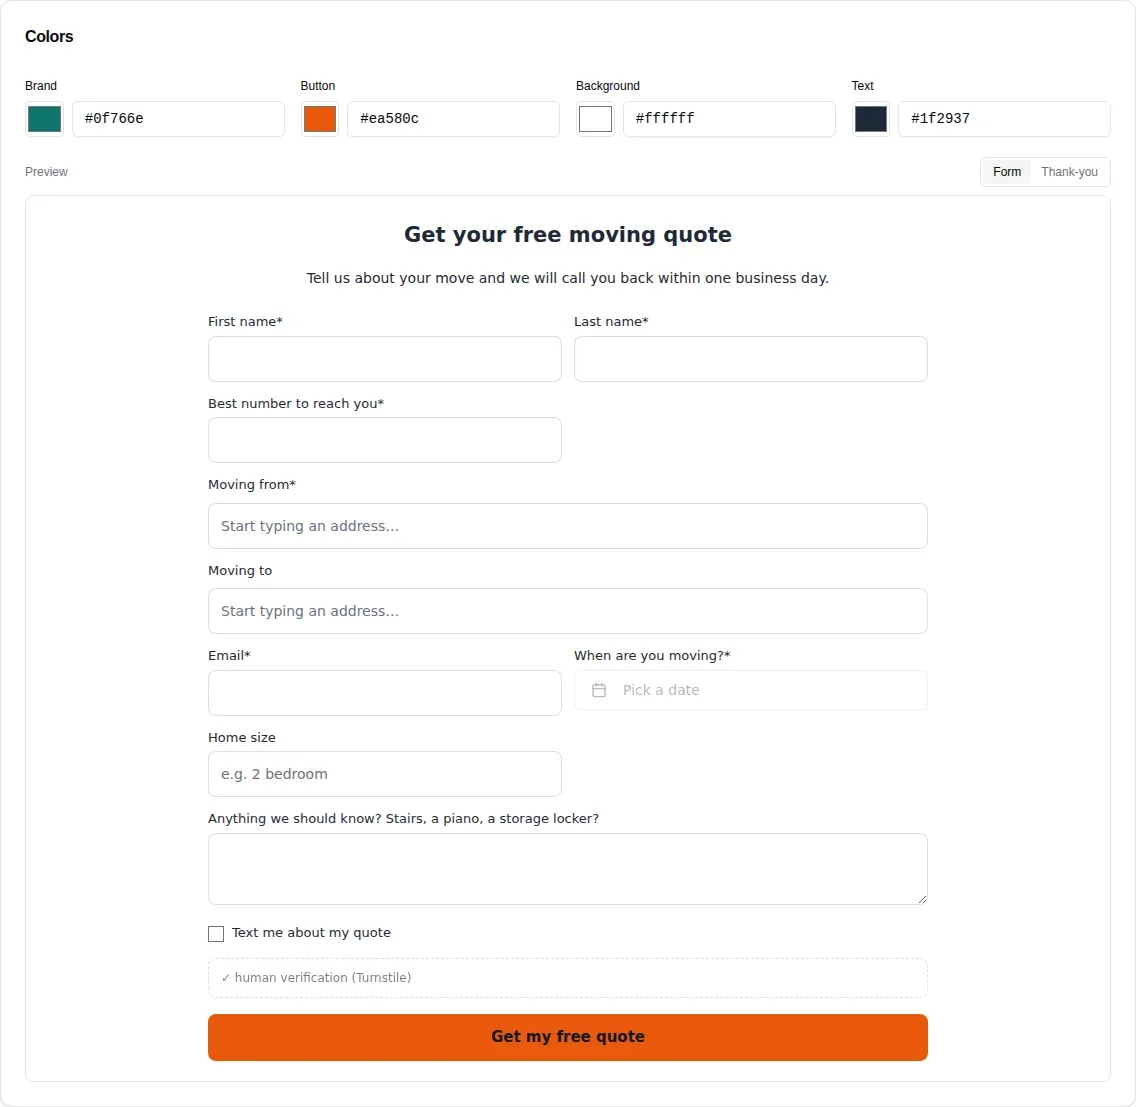
- Under Colors, set Brand, Button, Background and Text to match your website.
- Check the Preview under the colours. Switch between Form and Thank-you to see both screens.
Choose what happens after someone submits
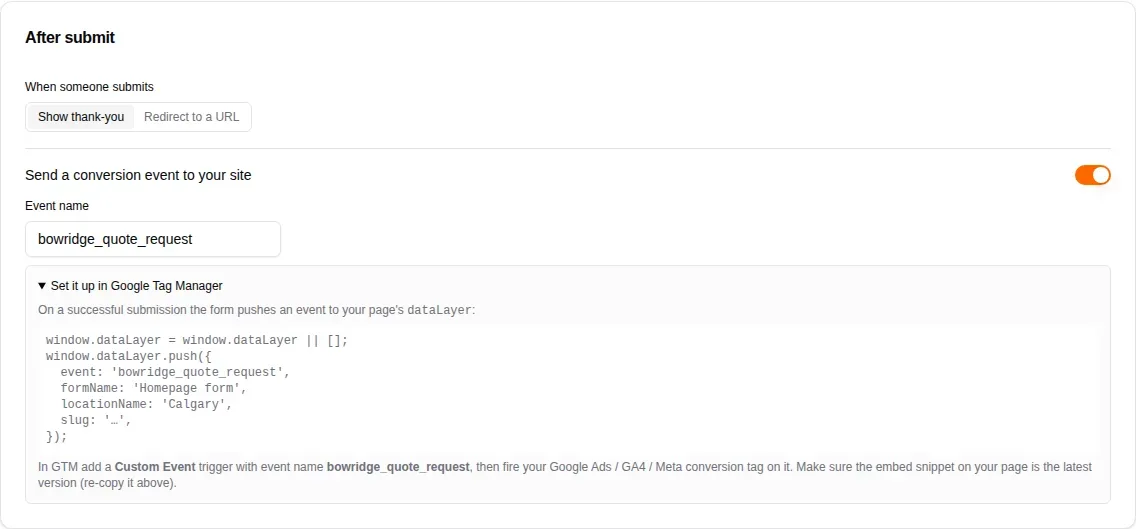
Under After submit, pick Show thank-you to show your thank-you message inside the form, or Redirect to a URL to send people to a thank-you page on your own site. That address must start with https://.
Turn on Send a conversion event to your site to count form leads in Google Ads, GA4 or Meta. Give the event a name, then open Set it up in Google Tag Manager for the exact trigger to add. It works with either choice above.
Lock the form to your website
List your website’s domains under Allowed domains, separated by commas. The form then only accepts leads sent from those sites, so nobody can copy your snippet onto another page. Leave it blank and the form works on any website.

Get told when a lead arrives
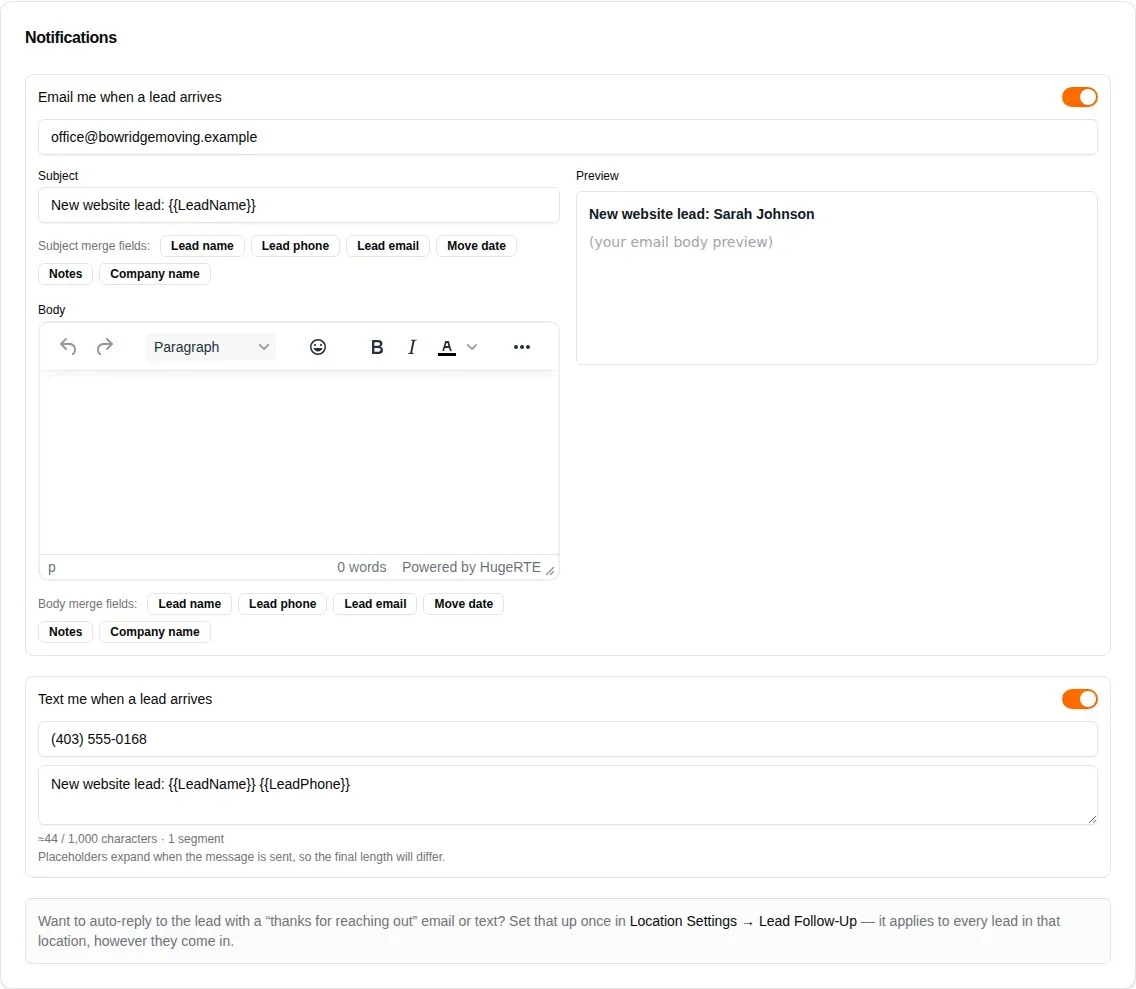
Under Notifications, turn on Email me when a lead arrives, Text me when a lead arrives, or both. Add the address or number, and use the merge fields to put the lead’s name, phone or move date in the message.
Save the form when you are done. You can come back to it with Edit at any time.
Put the form on your website
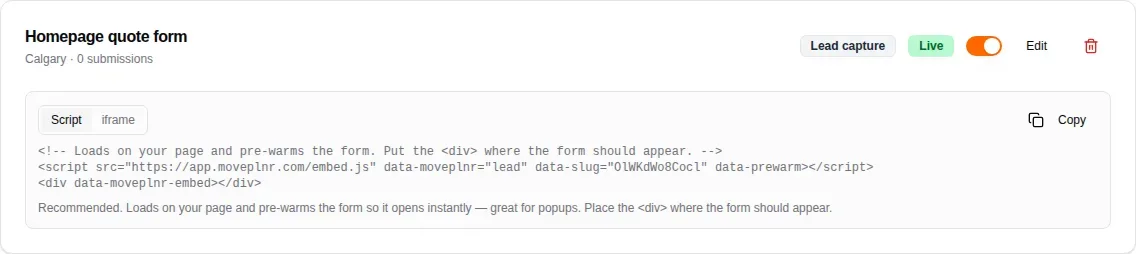
Each form on the list has its own snippet.
- Leave Script selected. It is the recommended version, and it opens the form instantly, even inside a popup.
- Click Copy.
- Paste the snippet into your website’s page where the form should appear. If your site builder has an “embed code” or “custom HTML” block, use that.
Choose iframe instead if your website only accepts a plain iframe. Paste it exactly where you want the form.
Every form someone sends becomes a new lead in MovePlnr, in the location you picked, with the lead source Website Embed. The address of the page it came from goes with it, so ad clicks and campaign tags count toward the right source.
The switch beside Live pauses a form without deleting it. A paused form shows Paused and stops taking leads until you switch it back on.
Check that it is working
Funnel health at the top of the page counts, for the last 7, 30 or 90 days, how many times your forms loaded, how many were sent, how many were refused, and the conversion rate. A brand new form shows “No traffic in this period” until visitors see it.
If a form loads but nothing comes in, the card says so. That usually means the form is refusing leads: check that your website’s domain is in Allowed domains.
Offer a full quote widget
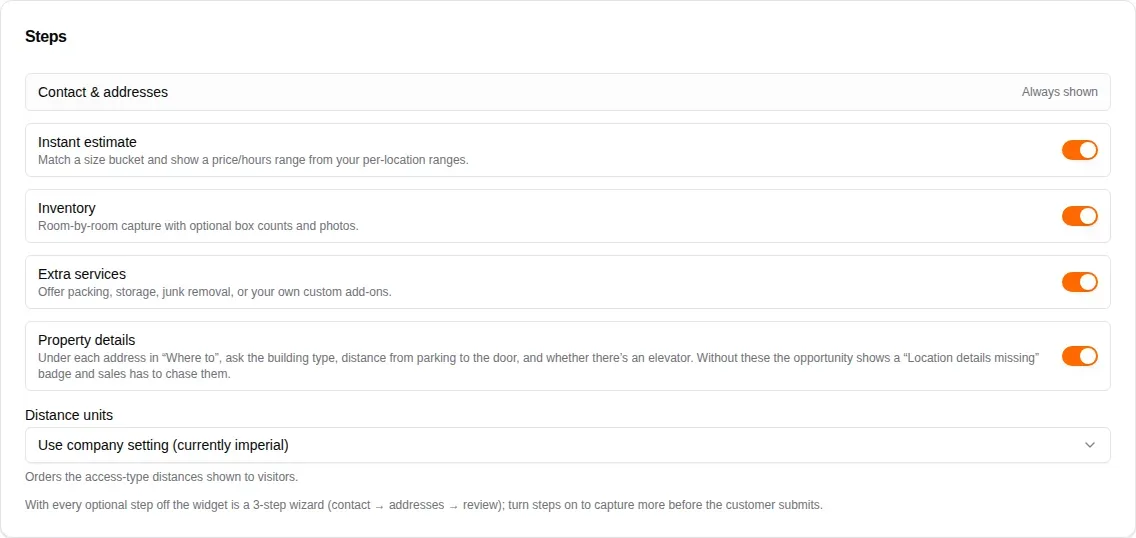
The full quote widget walks a visitor through several steps instead of one form: contact and addresses, then an instant estimate, a room by room inventory with photos, and the extra services you offer. Everything arrives on the lead, so your team starts where the customer left off.
- Click New embed, then Full quote widget.
- Under Steps, turn on the steps you want. Contact and addresses are always shown.
- Set its wording, layout, colours, domains and notifications the same way as a lead capture form, and save.
- Copy its snippet from the list and paste it on your site.
Turn website chats into leads
If you chat with visitors through Tawk.to, every new chat can become a lead in MovePlnr, with the whole conversation attached when the chat ends. A company admin sets it up once.
- In Integrations Settings, open Tawk.to.
- Enter your Property ID. You find it in Tawk.to under your property’s settings.
- Choose a Webhook Secret, a long password only you and Tawk.to know.
- Copy the Webhook URL shown on the page.
- Save.
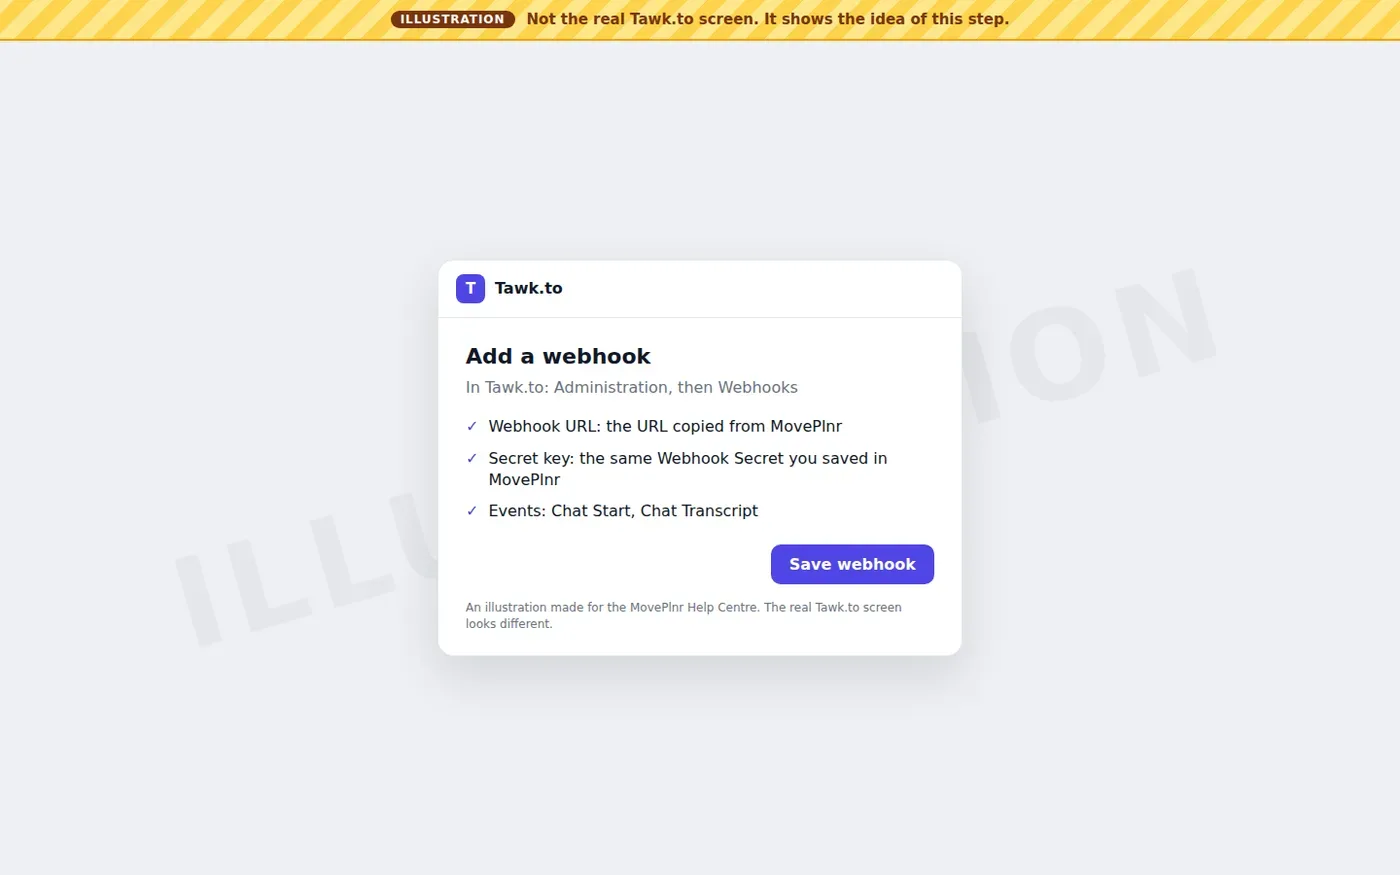
Then add a webhook in Tawk.to. You’ll see a Tawk.to screen like the illustration below; their own screen looks different.
- In Tawk.to, open Administration, then Webhooks, and add a webhook.
- Paste the Webhook URL from MovePlnr and the same Webhook Secret.
- Subscribe it to Chat Start and Chat Transcript, and save.

The page shows Live once it is set up, and “Waiting for first event” until the first chat comes in. Each new chat then creates a lead, or finds the customer you already have, and the transcript lands on it when the chat ends.
Turn off Enabled to pause chat leads without losing your setup. Disconnect removes the Property ID and secret; leads that already came in stay where they are.