
Before you start
Pipeline follow-ups come with the sales pipeline add-on, and only an admin can change them. To open the settings, click your profile picture at the top right, choose Company Settings, then Sales Pipeline Settings. Changes apply to every location in the company.
How reps claim and work leads day to day is in Work your sales pipeline. This guide is about the rules behind it.
Build the follow-up sequence
The sequence is the list of contacts every claimed lead gets, in order. Each step is one phone call, text message or email.
- On Pipeline Settings, find Follow-Up Sequence.
- Pick the type of contact for each step: Phone Call, Text Message or Email.
- Set the step’s timer, in minutes. That is how long the rep has to make the contact once the step starts.
- Set the step’s cooldown, in minutes. That is how long to wait after this step is done before the next step’s timer starts.
- Use the arrows to reorder steps, the bin to remove one, and Add Step to add one at the end.
- Click Save Changes.
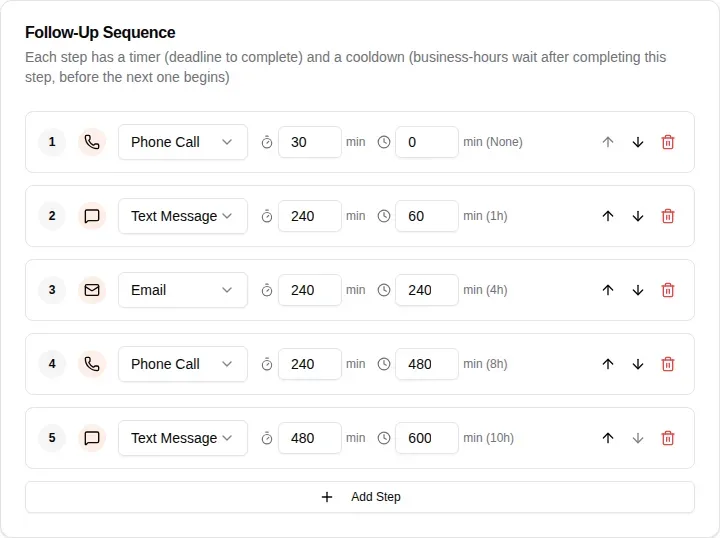
Cooldowns and timers count business hours only. A lead that comes in at 5:30 PM with a one-hour timer is due half an hour into the next business day, not at 6:30 PM. Set the hours at the top of the page, under Business Hours Start and Business Hours End.
How a step gets done
A step is done when the rep contacts the customer the way the step asks. Calls, texts and emails made from MovePlnr count on their own, as long as Auto-log activities from integrations is on. The lead then moves to the next step, and its timer starts once the cooldown has passed.
If the rep reaches the customer a different way, say an email while the step asks for a text, MovePlnr logs it as a detour. The step stays open and its timer keeps running.
Set the timers
The Business Hours & Timing card holds the rest of the clock.
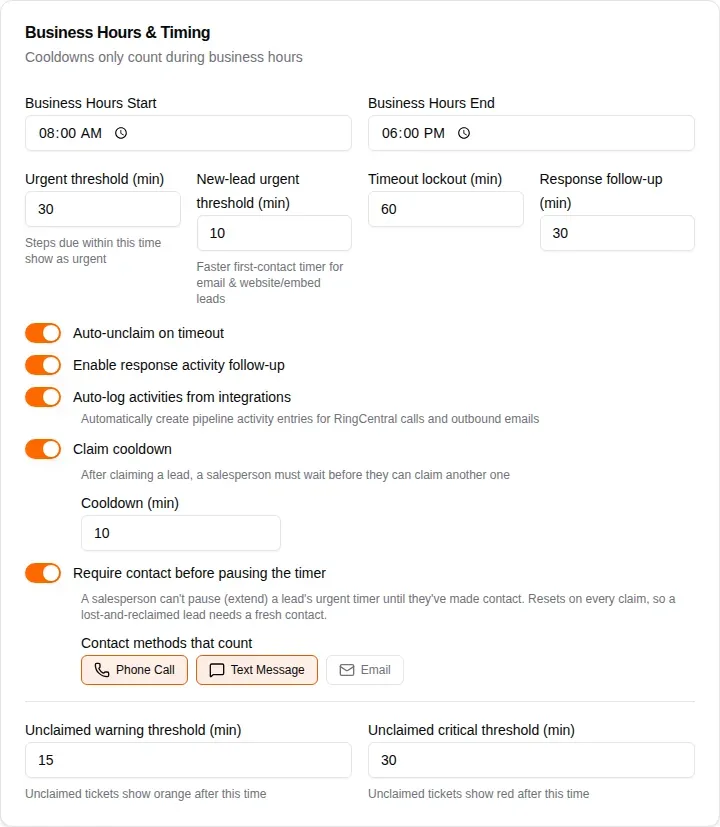
- Urgent threshold (min): a step due within this many minutes shows as urgent on New Business.
- New-lead urgent threshold (min): a faster first contact for leads that arrive by email, from your website or from an embed form.
- Timeout lockout (min): how long a rep waits before they can take back a lead that timed out on them.
- Response follow-up (min): with Enable response activity follow-up on, a customer reply gives the lead a fresh timer of this length, so the rep answers quickly. It never shortens a longer timer.
- Claim cooldown: after claiming a lead, a rep waits this long before they can claim another. It stops one rep from taking the whole pool at once.
- Require contact before pausing the timer: a rep can’t pause a lead’s timer until they have made contact. Pick which methods count under Contact methods that count.
- Unclaimed warning threshold (min) and Unclaimed critical threshold (min): unclaimed leads turn orange, then red, after these times.
Send quiet leads back to the pool
Turn on Auto-unclaim on timeout so a lead never sits with a rep who isn’t working it. When a step’s timer runs out, the lead leaves that rep and goes back to Unclaimed on New Business, where anyone on the team can claim it. The rep gets a notification that the lead timed out, and the lead’s feed records it.
Other reps can claim it right away. The rep who let it lapse sees it again only after the timeout lockout has passed.
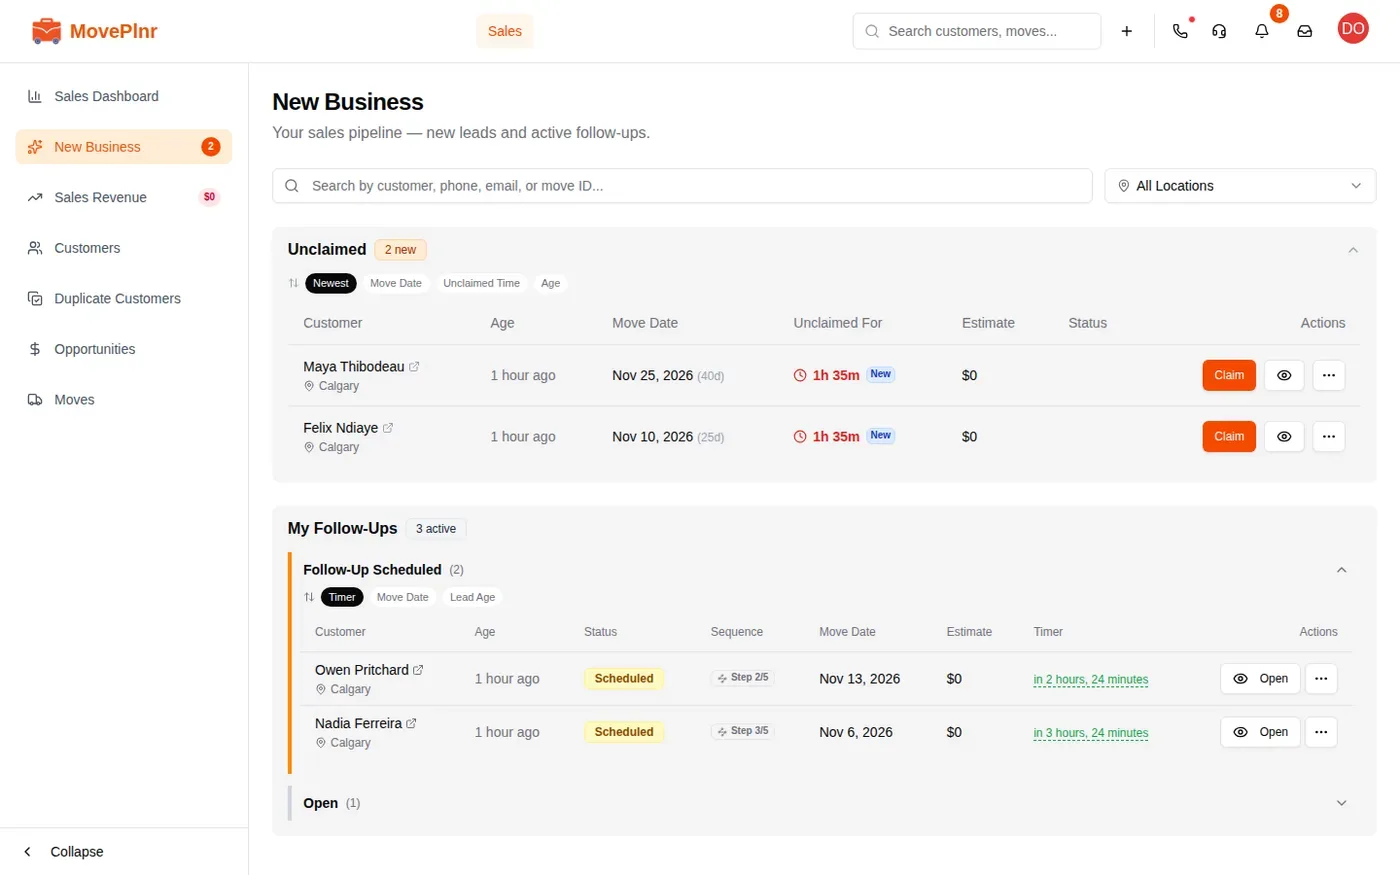
With the switch off, a claimed lead stays with its rep however late it runs. It still shows as urgent.
Close leads as lost when the sequence ends
The Repeat Loop card decides what happens after the last step.
- Leave Enable repeat loop off.
- Turn on Mark as lost opportunity automatically.
- In Additional cooldown before auto-close (min), set how long to wait after the last step’s cooldown before closing the lead.
- Click Save Changes.
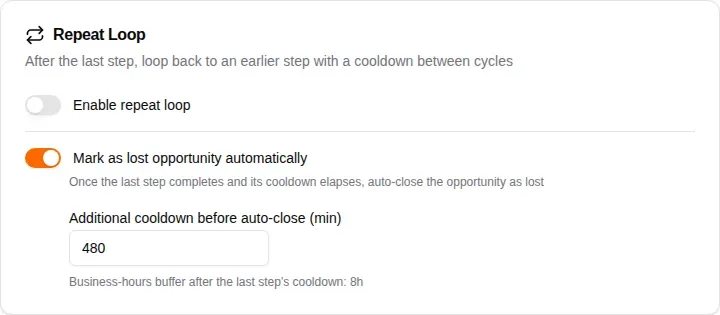
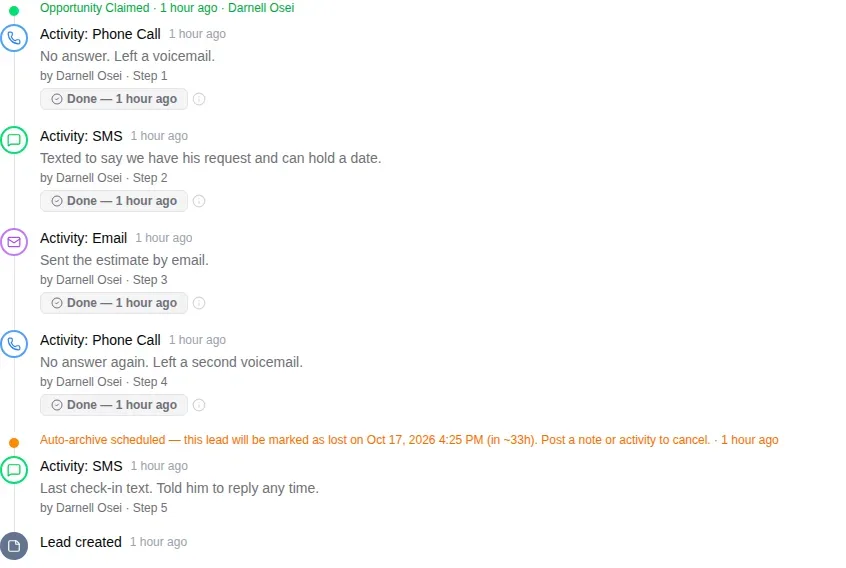
When the rep finishes the last step, the lead’s feed shows a note with the date and time it will be marked lost. Any note or activity on the lead cancels it, and so does a reply from the customer. A lead whose customer has ever replied is never closed this way: it gets a fresh timer instead.
Or keep going with a repeat loop
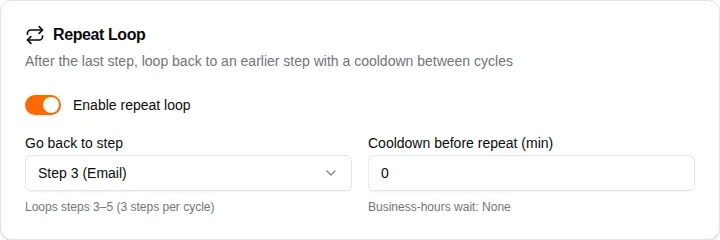
If you would rather keep working leads, turn on Enable repeat loop. Pick the step to start again from in Go back to step, and set Cooldown before repeat (min) for the pause between rounds. A repeat loop and closing as lost don’t go together: turning on the loop turns off Mark as lost opportunity automatically.
What your reps see on a lead
On each lead page, the Communications card shows the sequence as a stack of steps.
- The steps already done, folded into one row. Click it to see each one and when it happened.
- The current step, with its type, a “Why this timer” panel that shows when the step started and when it is due, and a button to make the contact: Send Email here.
- The next step and when it starts, then the rest of the sequence folded underneath.
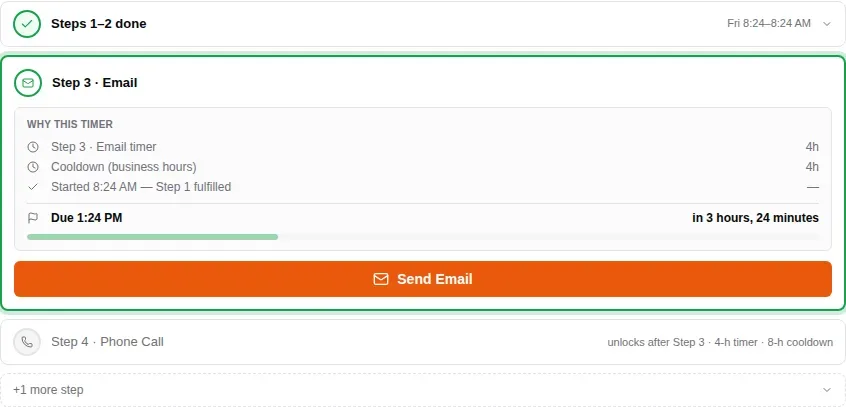
The current step turns amber when its deadline is close and red once it is overdue.
A detour shows as a chip on the step it happened during. Click the chip to see what was sent.
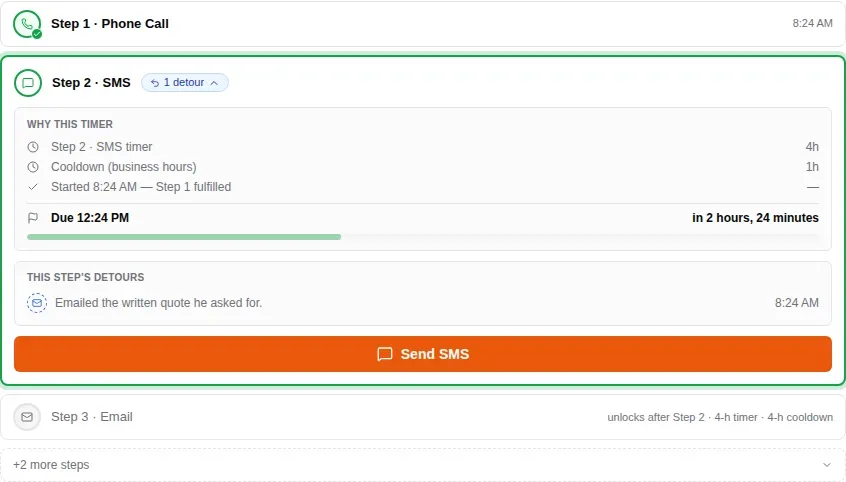
When a rep sets a custom follow-up for a set date and time, the sequence pauses on that lead until it comes around.
Reply to new leads automatically
The Lead Follow-Up page sends a thank-you email and text the moment a lead arrives from your public forms, ad platforms or the Website Embed. It needs the Lead Auto Follow-Up add-on. Each location has its own message.
- Click your profile picture, choose Location Settings, then Lead Follow-Up.
- Turn on Confirmation email. Choose who it is sent from in Send from, then write the subject and body. The merge fields fill in the lead’s name, phone, email, move date and your company name.
- Turn on Confirmation text and write the message. It goes only to leads that gave a phone number, and respects opt-outs.
- Check the preview, then click Save Lead Follow-Up.
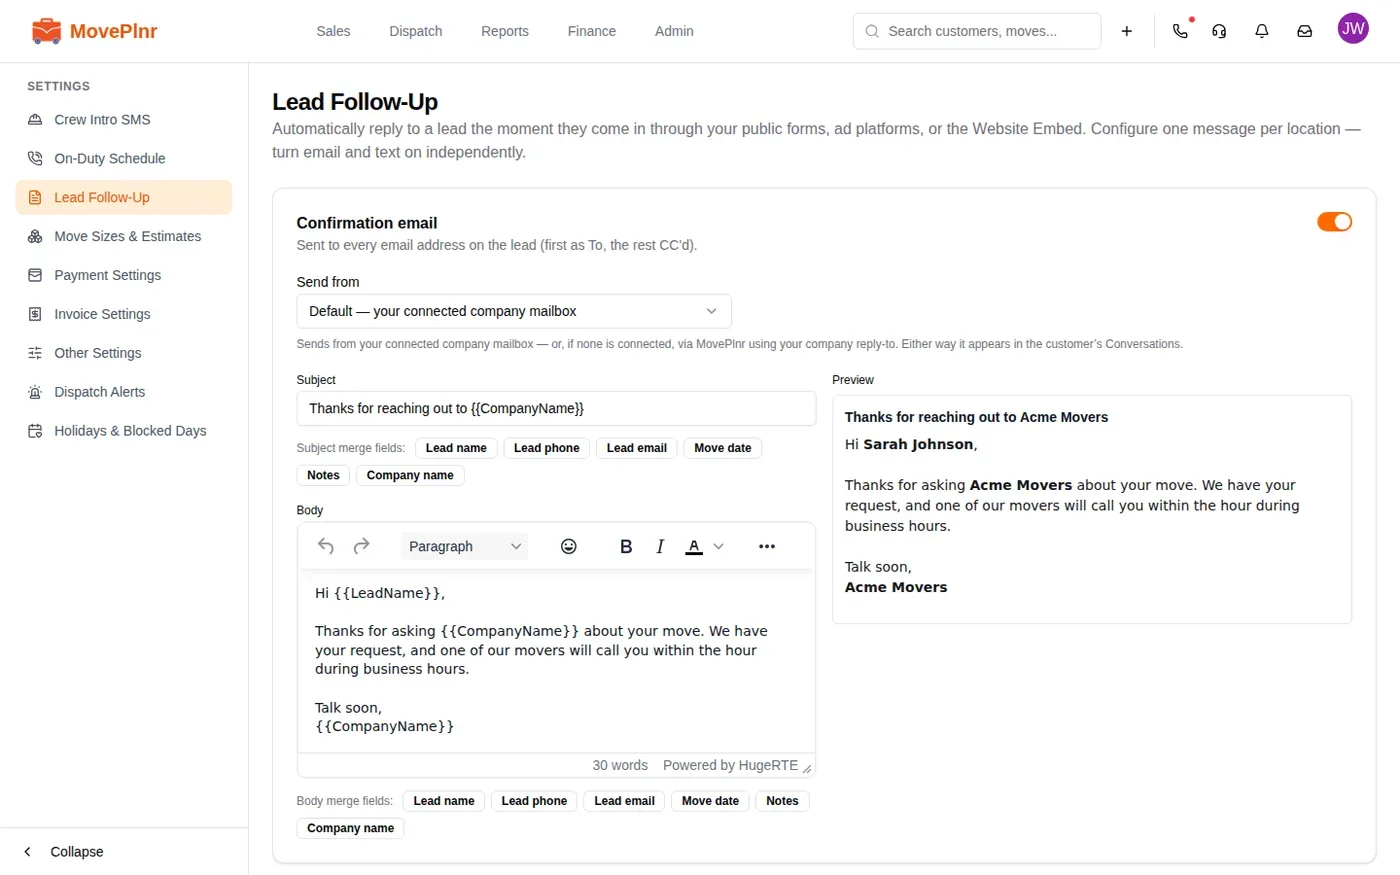
Both messages show in the customer’s conversation, so the rep who claims the lead can see what was sent.